Why Garage Floors Need a Protective Coating

Bare concrete is porous, fragile, and chemically reactive. Your garage floor faces four primary enemies that accelerate its deterioration:
- Moisture: Concrete wicks moisture from the ground (hydrostatic pressure). This causes efflorescence (white, powdery deposits), spalling (surface flaking), and prevents coatings from adhering properly.
- Chemicals: Modern vehicles drip oil, brake fluid, transmission fluid, and battery acid. Road salt and de-icers are highly corrosive. Household cleaners, paint, and fertilizers add to the chemical assault.
- Abrasion & Impact: Tires grind contaminants into the surface. Dropping tools, dragging equipment, and foot traffic create micro-damage that expands over time.
- Thermal Cycling & UV Exposure: Temperature swings make concrete expand and contract. Direct sunlight, especially in open or south-facing garages, degrades many materials.
Leaving your concrete unprotected isn’t just an aesthetic issue. A failing slab can reduce property value, become a safety hazard, and make the space unusable for its intended purposes. The cost of repairing or replacing a badly damaged slab far exceeds the investment in a proper coating system.
Best Garage Floor Coatings Compared
There is no single “best” coating, only the best coating for your specific situation. The right choice depends on your garage’s use, climate, budget, and preparation requirements. Below, we break down the five main categories.
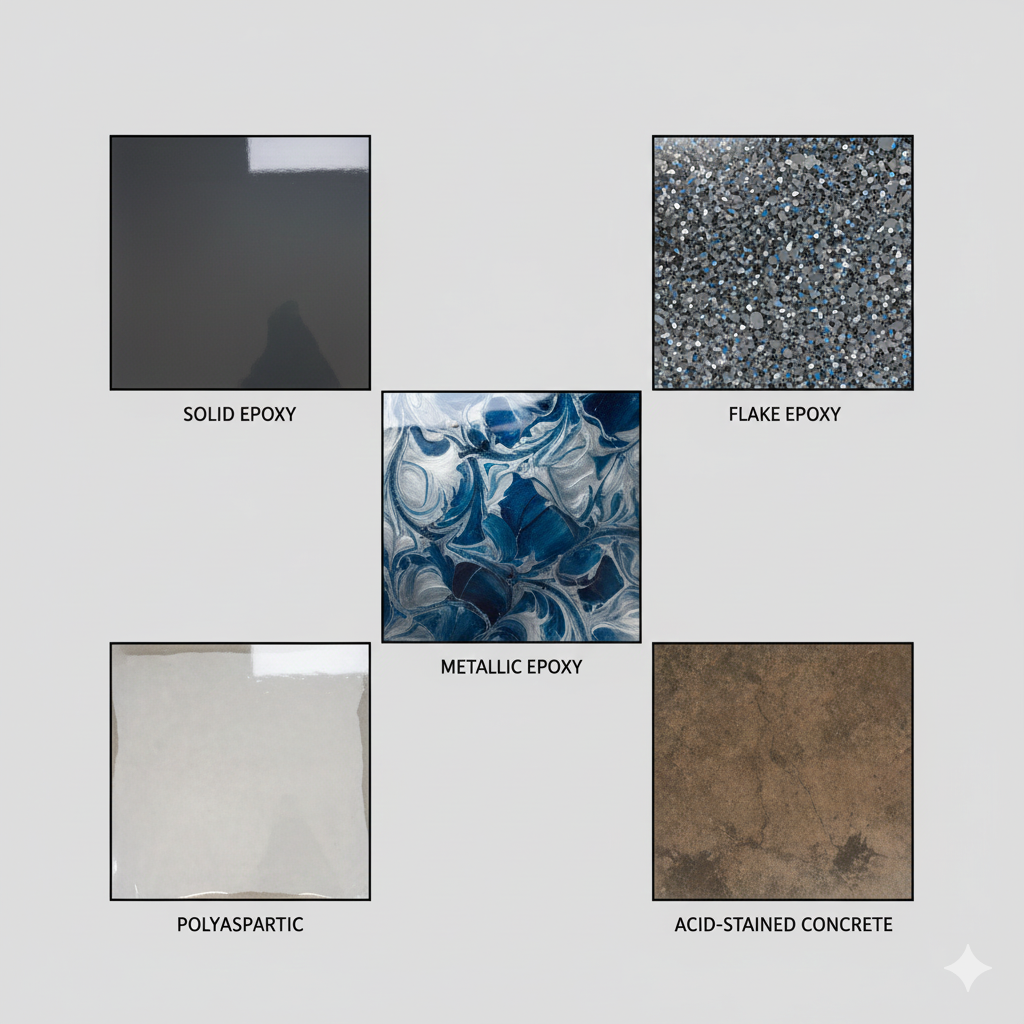
Epoxy Garage Floor Coating
Epoxy garage floor coating: A two-part thermosetting resin (resin + hardener) that chemically cures to form an extremely hard, durable plastic-like surface.
How it works: Applied as a liquid, it penetrates the concrete’s pores and bonds mechanically. Multiple coats (primer, base, topcoat) build thickness (10-20 mils) for protection.
Pros:
- Exceptional durability: Highly resistant to chemicals, abrasion, and impacts.
- Excellent adhesion: When applied to properly prepared concrete, it forms a tenacious bond.
- Cost-effective: Offers the best balance of performance and price for most homeowners.
- Customizable: Available in endless colors, with flake, quartz, or metallic decorative options.
Cons:
- Cure time sensitive: Requires specific temperatures (55°F-90°F) and humidity levels. Full cure can take 5-7 days.
- UV sensitivity: Most epoxy formulas will amber (yellow) when exposed to direct sunlight.
- Moisture sensitivity: Will bubble and delaminate if applied over a damp slab.
- Can be slippery when wet: Requires additives or broadcast aggregates for slip resistance.
Best use cases: Enclosed garages used for parking, storage, and light workshops. The standard for residential garages where budget and durability are primary concerns.
Polyaspartic Garage Floor Coating
What it is: A type of aliphatic polyurea, a fast-curing, UV-stable polymer that shares many properties with epoxy but with key advantages.
How it works: Similar application process to epoxy, but with dramatically faster cure times. It can be applied in a wider temperature range.
Pros:
- Extremely fast cure: Walkable in 1-2 hours, can park a car in 24-48 hours. Ideal for projects with minimal downtime.
- UV stability: Will not yellow or chalk in sunlight. Perfect for garages with windows, open doors, or partial outdoor exposure.
- Flexibility: More elastomeric than epoxy, allowing it to handle thermal expansion and minor substrate movement without cracking.
- Wide application window: Can be applied in colder and hotter temperatures than epoxy.
Cons:
- Higher cost: Typically 30-50% more expensive than a comparable epoxy system.
- Faster working time: Requires professional skill to apply correctly before it begins to set.
- Thinner film build: Often applied at thinner mil thicknesses, though it’s very dense.
Best use cases: Garages with windows/sun exposure, attached garages where fumes are a concern (faster off-gassing), busy households that need the garage back in service quickly, and commercial settings.
Polyurethane Garage Floor Coating
What it is: Typically used as a topcoat over an epoxy or polyaspartic base layer. It is a flexible, chemical-resistant finish.
How it works: Provides a sacrificial, wear-resistant layer. It absorbs impact and abrasion, protecting the more brittle base coat beneath.
Pros:
- Superior chemical resistance: The best defense against harsh solvents, fuels, and acids.
- Excellent abrasion & scratch resistance: Ideal for high-traffic or workshop areas.
- High-gloss, UV-stable finish: Maintains clarity and shine in sunlight.
- Flexibility: Handles thermal movement well.
Cons:
- Not a standalone system: Requires a properly applied base coat (epoxy/polyaspartic).
- Higher cost: Adds an additional step and material cost to the project.
- Professional application recommended: Sensitive to application techniques.
Best use cases: As a topcoat in garages that double as woodworking shops, mechanic spaces, or where chemical spills are likely. Also for protecting epoxy in sun-exposed areas to prevent yellowing.
Concrete Sealers
What they are: Penetrating or topical coatings that protect from within or sit on the surface.
Types:
- Penetrating Sealers (Silane/Siloxane): Invisible, breathable treatments that repel water and chlorides but offer no abrasion resistance.
- Topical Acrylic Sealers: Form a thin, glossy film. Low cost and easy DIY, but offer minimal durability and require frequent reapplication.
Pros:
- Low cost & easy application: The most budget-friendly option.
- Moisture protection: Penetrating sealers effectively block water ingress.
- Bare concrete look: Maintains the natural appearance of concrete floor.
Cons:
- Limited protection: Does not protect against abrasion, impacts, or most chemicals.
- Short lifespan: Topical acrylics may need reapplication every 1-2 years.
- Slippery when wet: Especially topical sealers.
Best use cases: For new concrete to protect it during the curing period, for detached garages used only for storage, or as a temporary solution on a tight budget. Not for active-use garages.
Concrete Stains & Dyes
What they are: Decorative color treatments, not protective coatings.
How they work: Stains react chemically with concrete (acid stains) or dyes penetrate the surface to add color. They require a sealer or clear coat for protection.
Pros:
- Unique aesthetic: Create variegated, natural, artistic looks.
- Will not peel or chip: Because they color the concrete itself.
Cons:
- Little to no protection: Rely entirely on the topcoat sealer for durability.
- Surface must be perfect: All flaws and prior damage will be highlighted.
- Complex process: Achieving consistent results requires skill.
Best use cases: For garages where aesthetics are the primary goal and the floor will see very light use. Always pair with a high-performance polyurethane or polyaspartic clear coat.
Epoxy vs Polyaspartic vs Polyurethane: Quick Comparison
| Feature | Epoxy | Polyaspartic | Polyurethane (as Topcoat) |
| Durability | Excellent | Excellent | Superior (for chemicals/abrasion) |
| Cure Time | 5-7 days (full cure) | 24-48 hours | 12-24 hours (as topcoat) |
| UV Resistance | Poor (yellows) | Excellent | Excellent |
| Cost (Installed) | $5 – $12/sq.ft. | $8 – $15+/sq.ft. | +$2 – $4/sq.ft. (over base) |
| Chemical Resistance | Very Good | Very Good | Best |
| Flexibility | Rigid | Flexible | Very Flexible |
| Best For | Value, durability, enclosed spaces | Fast turnaround, sun exposure, flexibility | Workshops, chemical exposure, UV protection |
How to Choose the Right Garage Floor Coating
Ask these five questions:
- How is the garage used?
- Parking & Storage: Epoxy is ideal.
- Workshop (Wood/Metal): Epoxy with a polyurethane topcoat.
- Showroom/Man Cave: Decorative epoxy flakes or stained concrete with polyaspartic clear coat.
- Rental/Commercial: Polyaspartic for durability and fast return to service.
- What is your climate and sun exposure?
- Cold Climates: Ensure the coating is rated for freeze-thaw cycles and use a system compatible with lower application temps (polyaspartic).
- Hot/Sunny Garages: Avoid standalone epoxy. Choose polyaspartic or epoxy with a UV-stable topcoat.
- Humid Areas: Moisture testing is critical. Use vapor barrier primers if needed.
- What is the condition of your concrete?
- New Slab (>30 days old): Must be fully cured. Moisture test is mandatory.
- Old Slab: May require extensive repair, grinding, and etching. Previous coatings must be completely removed.
- Damp Slab: Address the water issue first. Use a penetrating sealer or vapor mitigation system before applying any coating.
- What is your budget vs. lifespan expectation?
- Budget-focused, short-term (3-5 yrs): High-quality acrylic sealer or DIY epoxy kit.
- Value-focused, long-term (10+ yrs): Professional epoxy or polyaspartic system.
- “Forever Floor”: Professionally installed polyaspartic or hybrid system (epoxy base + polyurethane top).
- Will you DIY or hire a pro?
- DIY: Only consider if the area is small, preparation is minimal, and you use high-quality kits designed for amateurs. Temper your expectations.
- Professional: Required for large areas, significant prep, moisture issues, or when using polyaspartic/polyurethane. Guarantees proper performance.
Installation Basics: What Determines Success
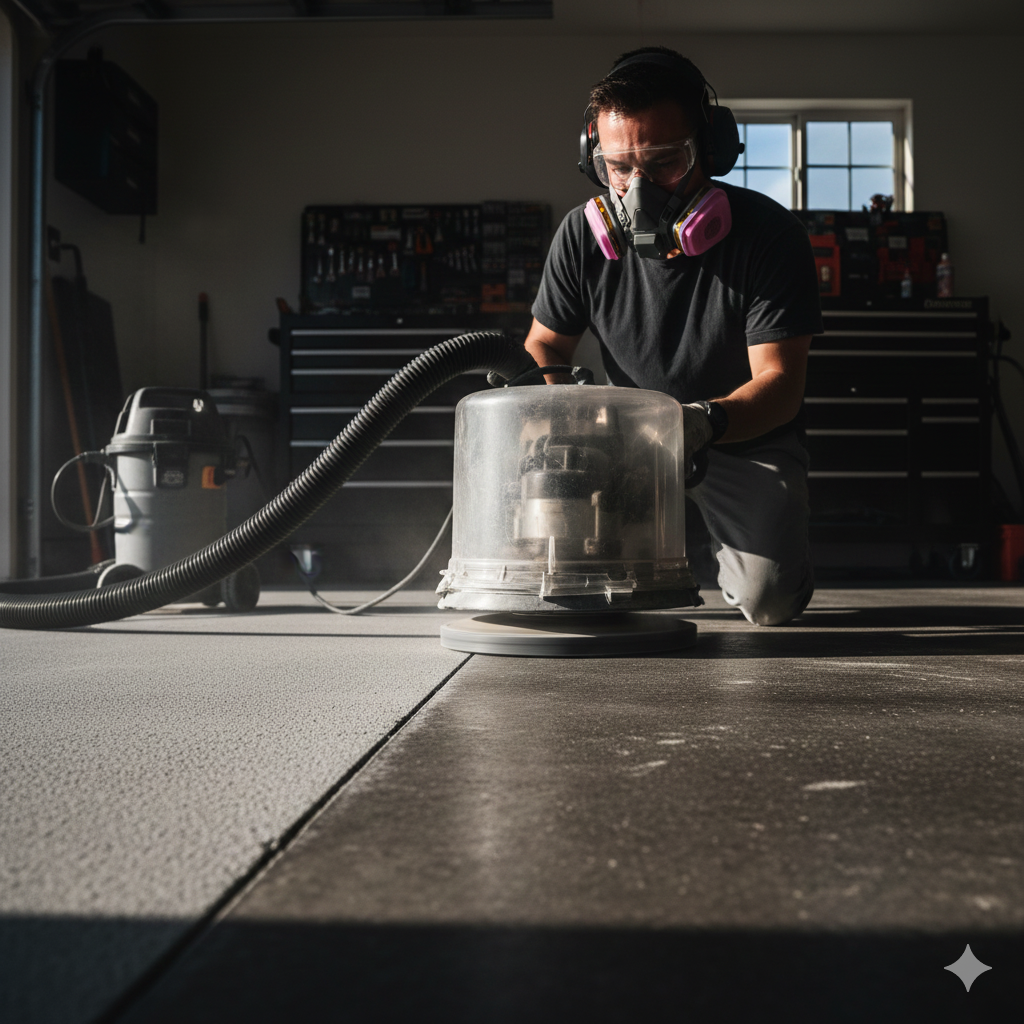
1. Surface Preparation (90% of Success)
Mechanical preparation is non-negotiable. Acid etching is outdated and unreliable.
- Diamond Grinding or Shot Blasting: Creates a concrete surface profile (CSP) for the coating to mechanically lock into. Removes laitance, contaminants, and old coatings.
- Cleaning: After grinding, the slab must be immaculate. Use a HEPA-filtered vacuum, then a degreaser, followed by a thorough rinse and dry.
2. Moisture Testing
Perform a calcium chloride test (ASTM F1869) or use an in-situ relative humidity probe (ASTM F2170). If moisture vapor transmission is too high, a vapor barrier primer or mitigation system is required.
3. Primers & Base Coats
- Primer: Used on porous or absorbent concrete to prevent air bubbles and ensure even coverage of the base coat.
- Base Coat: The workhorse layer that provides thickness, color, and chemical resistance.
4. Finish Coats & Slip Resistance
The final layer provides UV protection (if needed) and desired sheen. For safety, incorporate:
- Anti-Skid Additives: Broadcast into wet coating for textured finish.
- Grit Additives: Mixed into the coating for a uniform, non-slip surface.
Common Mistakes That Cause Garage Floor Coating Failure
- Skipping or Improper Surface Prep: Coating over dirt, grease, or sealers guarantees peeling.
- Ignoring Moisture: Applying any coating to a damp slab is the fastest route to catastrophic failure (bubbling, blistering).
- Choosing the Wrong Product: Using indoor epoxy in a sunny garage, or a water-based product in a mechanic’s shop.
- Poor DIY Installation: Inadequate mixing, incorrect temperature/humidity, improper rolling technique, or ignoring recoat windows.
- Applying Too Thin: Not achieving the recommended mil thickness leaves the coating vulnerable to wear-through and chemical attack.
Maintenance Tips to Extend Coating Lifespan
- Regular Cleaning: Sweep weekly. Mop monthly with a pH-neutral cleaner and soft microfiber mop. Avoid harsh acids or alkaline cleaners.
- Immediate Spill Cleanup: Wipe up oil, gas, or chemicals promptly. While resistant, prolonged exposure can stain or damage the surface.
- Use Protective Mats: Place anti-fatigue mats in work areas and water-absorbent mats under vehicles in winter to capture salt and snowmelt.
- Avoid Abrasive Drag: Use furniture pads under heavy equipment. Lift rather than drag objects.
- Inspect Annually: Look for any chips or wear spots. Small damage can be repaired with a compatible patching kit to prevent it from spreading.
Which Garage Floor Coating Lasts the Longest?
The longest-lasting system is a multi-coat hybrid system professionally installed on a perfectly prepared, dry slab:
- Base: 100% solids epoxy or polyaspartic (15-20 mils)
- Topcoat: Aliphatic polyurethane or polyaspartic (5-10 mils)
Expected Lifespan: 15-25+ years in a residential setting.
Critical Reality Check: No product, regardless of quality, will last if the preparation is poor or the environmental conditions are wrong. Longevity is a formula: Proper Preparation + Correct Product + Professional Installation = Maximum Lifespan.
Conclusion
There is no universal “best” garage floor coating. The right choice is a deliberate match between your garage’s function, environment, and your expectations.
- For the balance of cost and performance in a typical enclosed garage: choose epoxy.
- For fast installation and sun exposure: choose polyaspartic.
- For maximum chemical resistance in a workshop: choose an epoxy base with a polyurethane topcoat.
- For a low-budget, temporary solution: choose a high-quality penetrating sealer.
Remember: the coating is only as good as the concrete it’s applied to. Invest first in proper diagnosis and preparation. This upfront cost and effort are what transform a simple coating into a long-term asset that protects your garage, your belongings, and your home’s value for decades.
FAQs
Q: What coating lasts longest on a garage floor?
A: A professionally installed hybrid system with an epoxy or polyaspartic base coat and a polyurethane topcoat can last 20+ years. Product alone is less important than proper surface preparation and installation.
Q: Is epoxy good for garages?
A: Yes, epoxy is an excellent choice for most enclosed residential garages. It provides outstanding durability and chemical resistance at a reasonable cost. Avoid it in garages with direct, prolonged sunlight as it will yellow.
Q: Can I install it myself?
A: DIY is possible for small, simple projects using consumer-grade kits, but results vary widely. For best results, professional installation is recommended, especially for large areas, problematic slabs (moisture, cracks), or advanced systems like polyaspartic.
Q: Which coating is best for outdoor garages or carports?
A: Polyaspartic is the best choice for areas exposed to sunlight and weather due to its UV stability and flexibility. A polyurethane topcoat over epoxy is also a good UV-resistant option.
Q: How much does a garage floor coating cost?
A: DIY kits: $3-$6 per sq.ft. for materials. Professional installation: $5-$12 per sq.ft. for epoxy, $8-$15+ per sq.ft. for polyaspartic. Price depends on system complexity, floor condition, and geographic location.