Planning to coat your garage or basement floor, but noticing it’s not completely level? You’re not alone, uneven concrete is a common issue in North Texas homes. Before applying epoxy or any floor coating, it’s crucial to address the problem otherwise, you’ll end up with peeling, bubbling, or cracks down the road.
So, how do you fix uneven concrete floors in DFW homes before coating? The process usually involves grinding, self-leveling compounds, or repairs, depending on the severity. In this article, we’ll walk you through the causes of uneven concrete, the best fixing methods, and tips to ensure a smooth, long-lasting finish.
Common Causes of Uneven Concrete Floors
Concrete floors in DFW homes can become uneven over time due to various factors. Addressing these issues before applying a coating is crucial for ensuring a smooth, durable finish. This guide will walk you through the process of fixing uneven concrete floors, from assessing the problem to preparing the surface for coating.
Uneven concrete floors can result from several factors. One common cause is soil movement, which can lead to settling or heaving of the concrete slab. Additionally, poor installation practices, such as inadequate compaction or improper curing, can contribute to uneven surfaces. Understanding these causes is the first step in addressing the problem effectively.
- Soil movement and settling
- Poor installation practices
- Inadequate compaction
- Improper curing
Importance of Leveling Before Coating
Leveling the concrete floor before applying a coating is essential for several reasons. A level surface ensures that the coating adheres properly, preventing peeling or cracking. It also enhances the aesthetic appeal of the floor, providing a smooth, even finish. Moreover, a leveled floor improves safety by reducing trip hazards.
- Ensures proper adhesion of the coating
- Enhances aesthetic appeal
- Improves safety by reducing trip hazards
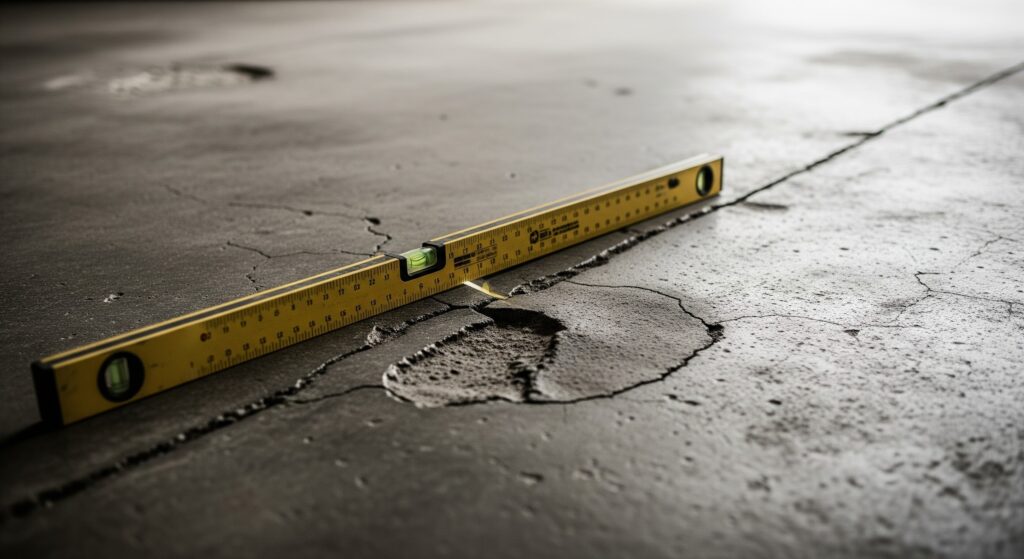
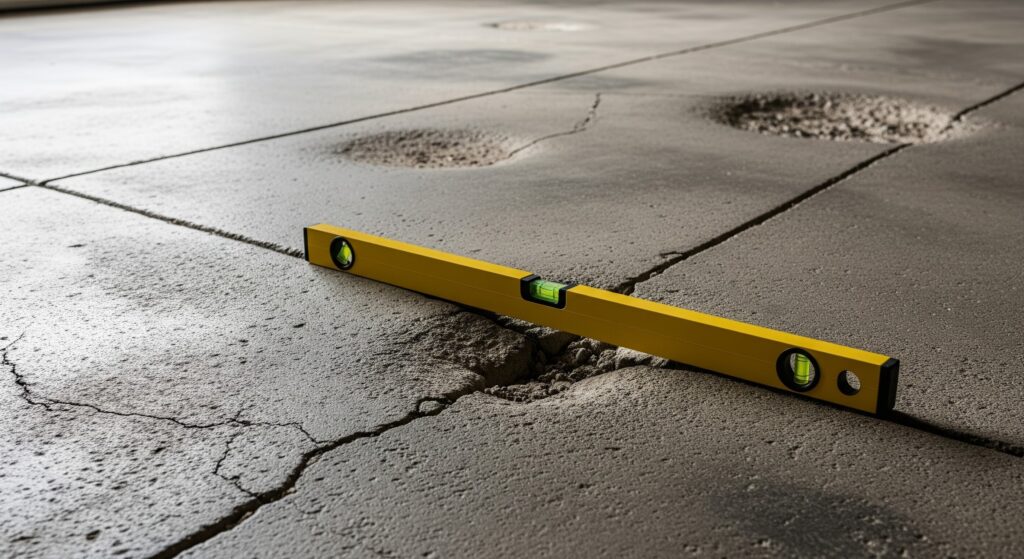
Assessing the Extent of Unevenness
Before you can fix an uneven concrete floor, you need to assess the extent of the problem. This involves both visual inspection and the use of measuring tools to determine the severity of the unevenness.
Visual Inspection Techniques
Start by visually inspecting the floor for obvious signs of unevenness. Look for cracks, dips, or raised areas that indicate a problem. Pay attention to areas where the floor meets walls or other structures, as these are common spots for unevenness to occur.
- Look for cracks, dips, or raised areas
- Inspect where the floor meets walls
- Identify any visible signs of unevenness
Using Level and Measuring Tools
To get a more accurate assessment, use a level and measuring tools. A long level can help you identify high and low spots on the floor. Additionally, a laser level or straightedge can provide precise measurements of the floor’s unevenness.
- Use a long level to identify high and low spots
- Employ a laser level for precise measurements
- Measure the extent of unevenness accurately
Surface Preparation for Uneven Concrete Floors
Proper surface preparation is crucial for fixing uneven concrete floors. This involves cleaning, removing existing coatings, and repairing any cracks or holes.
Cleaning and Degreasing
Begin by thoroughly cleaning the floor to remove dirt, dust, and grease. Use a degreaser to eliminate any oil or grease stains, as these can interfere with the adhesion of leveling compounds and coatings.
- Remove dirt, dust, and grease
- Use a degreaser for oil stains
- Ensure a clean surface for better adhesion
Removing Existing Coatings
If the floor has an existing coating, it must be removed before leveling. Use a floor grinder or chemical stripper to remove the old coating, ensuring a clean surface for the new leveling compound.
- Use a floor grinder or chemical stripper
- Remove old coatings completely
- Prepare the surface for new leveling compound
Repairing Cracks and Holes
Repair any cracks or holes in the concrete before leveling. Use a concrete patching compound to fill in these areas, ensuring a smooth, even surface for the leveling compound.
- Fill cracks and holes with patching compound
- Ensure a smooth surface for leveling
- Address structural issues before proceeding
Leveling Methods for Concrete Floors
There are several methods for leveling concrete floors, each with its own advantages. Choose the method that best suits your needs and the condition of your floor.
Self-Leveling Compounds
Self-leveling compounds are a popular choice for leveling concrete floors. These compounds are easy to apply and create a smooth, even surface. Simply mix the compound according to the manufacturer’s instructions and pour it onto the floor.
- Easy to apply and create a smooth surface
- Mix and pour according to instructions
- Ideal for minor unevenness
Grinding and Sanding
For more severe unevenness, grinding and sanding may be necessary. Use a concrete grinder to remove high spots and create a level surface. This method is more labor-intensive but effective for significant unevenness.
- Use a concrete grinder for high spots
- Effective for significant unevenness
- Requires more labor and time
Concrete Resurfacing
Concrete resurfacing involves applying a thin layer of new concrete over the existing floor. This method is suitable for floors with extensive damage or unevenness. It provides a fresh, level surface for coating.
- Apply a thin layer of new concrete
- Suitable for extensive damage
- Provides a fresh, level surface
Moisture Testing and Mitigation
Moisture can affect the adhesion and durability of floor coatings. Conduct moisture tests and apply moisture barriers as needed to ensure a successful coating application.
Importance of Moisture Control
Controlling moisture is crucial for preventing coating failure. Excess moisture can cause the coating to bubble or peel, leading to costly repairs. Ensure that the floor is dry and moisture levels are within acceptable limits before proceeding.
- Prevents coating failure
- Avoids bubbling or peeling
- Ensures long-lasting results
Conducting Moisture Tests
Perform moisture tests to determine the moisture content of the concrete. Use a moisture meter or calcium chloride test to measure moisture levels accurately.
- Use a moisture meter or calcium chloride test
- Measure moisture content accurately
- Ensure levels are within acceptable limits
Applying Moisture Barriers
If moisture levels are too high, apply a moisture barrier to the floor. This barrier will prevent moisture from seeping through the concrete and affecting the coating.
- Apply a moisture barrier if needed
- Prevents moisture seepage
- Protects the coating from damage
Choosing the Right Leveling Product
Selecting the right leveling product is essential for achieving a smooth, even floor. Consider factors such as the extent of unevenness and the type of coating you plan to apply.
Factors to Consider
When choosing a leveling product, consider the floor’s condition, the type of coating, and the desired finish. Some products are better suited for minor unevenness, while others are designed for more severe issues.
- Consider the floor’s condition
- Match the product to the type of coating
- Choose based on the desired finish
Types of Leveling Compounds
There are various types of leveling compounds available, each with its own properties. Self-leveling compounds are ideal for minor unevenness, while thicker compounds are suitable for more significant issues.
- Self-leveling compounds for minor issues
- Thicker compounds for severe unevenness
- Choose based on the floor’s needs
Application Techniques for Floor Leveling
Proper application techniques are crucial for achieving a smooth, even floor. Follow these steps to ensure a successful leveling process.
Mixing and Pouring Self-Leveling Compounds
Mix the self-leveling compound according to the manufacturer’s instructions. Pour the mixture onto the floor, starting at the lowest point and working your way to the highest.
- Mix according to instructions
- Pour starting at the lowest point
- Work towards the highest point
Using Trowels and Squeegees
Use trowels and squeegees to spread the leveling compound evenly across the floor. This ensures a smooth, even surface and helps eliminate air bubbles.
- Spread compound evenly with trowels
- Use squeegees to eliminate air bubbles
- Ensure a smooth, even surface
Ensuring Even Distribution
Ensure that the leveling compound is distributed evenly across the floor. Check for any low spots or areas that need additional compound, and adjust as necessary.
- Check for low spots
- Add additional compound as needed
- Ensure even distribution
Curing and Drying Process
Proper curing and drying are essential for a successful floor leveling project. Follow recommended curing times and consider environmental factors that may affect the process.
Recommended Curing Times
Dallas–Fort Worth climate (hot summers, mild winters, clay soil) impacts how fast concrete cures and releases moisture.
- Standard Cure Before Coating:
- 28 days minimum for new concrete slabs before applying epoxy/polyaspartic/polyurea.
- This allows the majority of hydration and shrinkage to complete.
- Moisture Considerations:
- Even at 28 days, some slabs still emit high moisture vapor (common in DFW’s humid summers). Always test before coating.
- If moisture vapor emission > 3 lbs/1000 sq ft/24h → use a moisture vapor barrier primer.
Final Inspection and Touch-ups
After the leveling compound has cured, conduct a final inspection to ensure the floor is smooth and even. Make any necessary touch-ups before proceeding with the coating.
Checking for Remaining Imperfections
Inspect the floor for any remaining imperfections, such as low spots or rough areas. Address these issues before applying the coating to ensure a smooth finish.
- Inspect for low spots or rough areas
- Address imperfections before coating
- Ensure a smooth, even surface
Making Minor Adjustments
Make any necessary adjustments to the floor, such as filling in low spots or sanding rough areas. This ensures that the floor is ready for coating.
- Fill in low spots as needed
- Sand rough areas for a smooth finish
- Prepare the floor for coating
Preparing the Leveled Floor for Coating
Once the floor is level and smooth, prepare it for coating by etching the surface and applying a primer.
Etching the Surface
Etch the surface of the concrete to create a rough texture that promotes adhesion. Use an etching solution or mechanical etching tool for this step.
- Create a rough texture for adhesion
- Use an etching solution or tool
- Prepare the surface for primer
Applying Primer
Apply a primer to the etched surface to enhance the adhesion of the coating. Follow the manufacturer’s instructions for application and drying times.
- Enhance adhesion with primer
- Follow application instructions
- Allow primer to dry before coating
Benefits of Professional Floor Leveling Services
While DIY floor leveling is possible, professional services offer several advantages. Consider hiring experts for a more efficient and effective leveling process.
Expertise and Specialized Equipment
Professional floor leveling services have the expertise and specialized equipment needed to achieve a smooth, even floor. They can handle complex issues and ensure a high-quality finish.
- Access to specialized equipment
- Expertise in handling complex issues
- Ensure a high-quality finish
Time and Cost Efficiency
Hiring professionals can save you time and money in the long run. They can complete the project more quickly and efficiently, reducing the risk of costly mistakes.
- Save time and money
- Complete projects quickly and efficiently
- Reduce the risk of mistakes
Final Thoughts
Fixing uneven concrete floors in DFW homes before coating is a crucial step in ensuring a smooth, durable finish. By following the outlined steps, you can achieve a level surface that enhances the appearance and functionality of your floor. Whether you choose a DIY approach or hire professionals, proper preparation and maintenance are key to long-lasting results.
FAQs
How much does it cost to level an uneven concrete floor?
The cost to level an uneven concrete floor varies depending on the extent of the unevenness and the method used. On average, homeowners can expect to pay between $3 and $25 per square foot for professional leveling services. DIY options may be less expensive but require time and effort.
Can you level a concrete floor with epoxy?
Epoxy is not typically used for leveling concrete floors. Instead, self-leveling compounds or concrete resurfacing methods are recommended for achieving a smooth, even surface. Epoxy is better suited as a coating applied after the floor has been leveled.
How long does it take to level a concrete floor?
The time it takes to level a concrete floor depends on the method used and the extent of the unevenness. Self-leveling compounds can cure in as little as 24 hours, while more extensive resurfacing projects may take several days. Always follow the manufacturer’s instructions for curing times.